
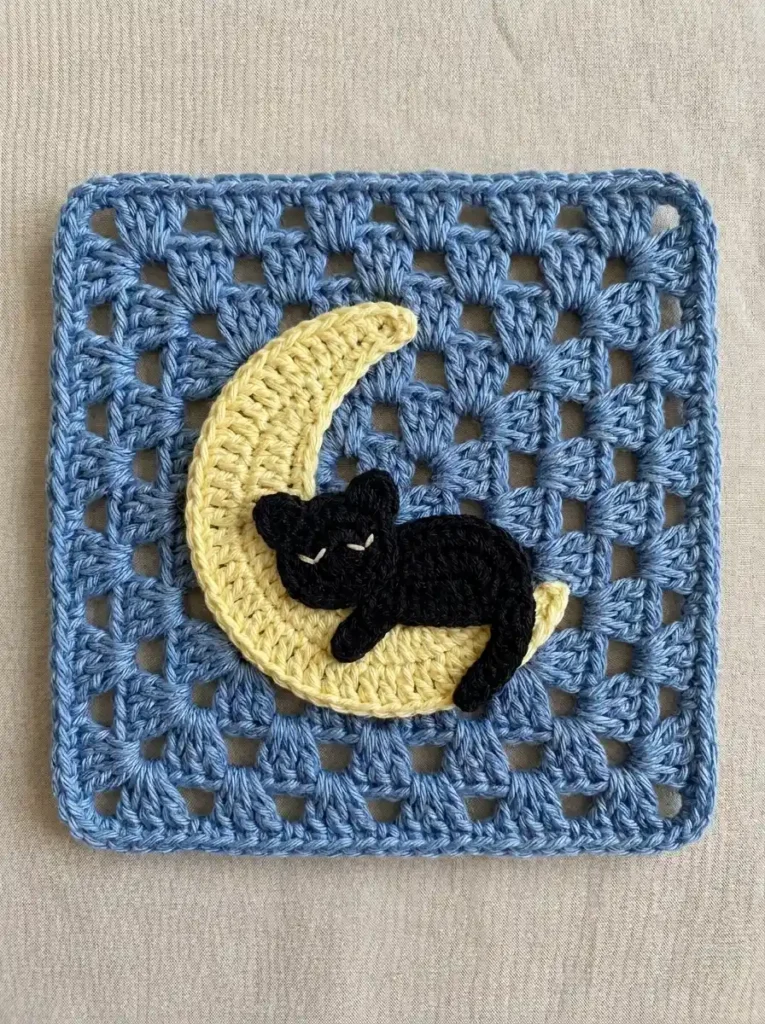
This sleepy moon cat square combines an open dusty-blue granny square with a broad butter-yellow crescent and a small black cat stretched across the lower arm of the moon. Two compact rounded-triangle ears, tiny closed eyes, one hanging front paw, and a thick curved tail create the relaxed sleeping silhouette.
The blue base is crocheted first and blocked flat. The crescent, cat body, head, paw, and tail are then made separately or directly from their parent piece and layered onto the square. The moon is deliberately broad through the center and lower curve so there is enough yellow showing both above and below the sleeping cat.
Project at a glance
| Skill level | Advanced beginner to easy intermediate |
|---|---|
| Terminology | US crochet terms |
| Construction | Six granny rounds, narrow outer edging, and layered appliqués |
| Yarn | DK or light-worsted cotton or cotton-blend |
| Hook | 3.5 mm or a size that produces neat, defined stitches |
| Finished size | Usually around 15–18 cm square with this yarn and hook combination |
Materials
- DK or light-worsted cotton or cotton-blend yarn in dusty medium blue
- A small amount of pale butter yellow or cream-yellow
- A small amount of black yarn
- A short strand of pale yellow or cream yarn for the sleepy eyes
- 3.5 mm crochet hook
- Yarn needle
- Scissors
- Stitch marker
- Blocking pins and blocking surface
A smooth cotton or cotton-rich yarn helps the granny clusters remain open and crisp while giving the moon and black appliqué pieces enough body to hold their shapes. If you use a softer acrylic, choose a hook size that keeps the appliqué fabric reasonably firm.
Stitches and abbreviations
- ch – chain
- sl st – slip stitch
- sc – single crochet
- hdc – half double crochet
- dc – double crochet
- sc2tog – single crochet two stitches together
- sp – space
- RS – right side
- WS – wrong side
Before you start
The granny square is worked in joined rounds with the RS facing throughout. Do not turn between rounds. The beginning ch 3 counts as the first dc. Slip-stitch joins do not count as stitches.
The crescent is worked in shaped rows. The foundation edge becomes the shorter concave edge, while increases progressively lengthen the outside edge and make the strip curve. The stitches left unworked near the row ends help taper the moon toward its two tips.
The cat body and head are worked as flat ovals around both sides of short foundation chains. Mark the first stitch when working these continuous rounds.
Crochet pattern
Dusty-blue granny square
With blue, ch 4 and join with a sl st in the first ch to form a small ring.
R1: Ch 3, 2 dc in ring, ch 2, [3 dc in ring, ch 2] × 3. Join with a sl st to the top of the beginning ch 3. Do not turn. (12 dc, 4 ch-2 corner spaces; 4 clusters)
Sl st across the next 2 dc and into the next ch-2 corner sp.
R2: Ch 3, 2 dc, ch 2, 3 dc in the same corner sp, ch 1, [(3 dc, ch 2, 3 dc) in the next corner sp, ch 1] × 3. Join to the top of the beginning ch 3. (24 dc, 4 ch-2 corner spaces, 4 ch-1 spaces; 8 clusters)
Sl st across to the next ch-2 corner sp.
R3: Ch 3, 2 dc, ch 2, 3 dc in the same corner sp. [Ch 1, 3 dc in the next ch-1 sp, ch 1, (3 dc, ch 2, 3 dc) in the next corner sp] × 3. Ch 1, 3 dc in the final ch-1 sp, ch 1. Join to the top of the beginning ch 3. (36 dc, 4 ch-2 corner spaces, 8 ch-1 spaces; 12 clusters)
Sl st across to the next ch-2 corner sp.
R4: Ch 3, 2 dc, ch 2, 3 dc in the same corner sp. [[Ch 1, 3 dc in the next ch-1 sp] × 2, ch 1, (3 dc, ch 2, 3 dc) in the next corner sp] × 3. [Ch 1, 3 dc in the next ch-1 sp] × 2, ch 1. Join to the beginning ch 3. (48 dc, 4 ch-2 corner spaces, 12 ch-1 spaces; 16 clusters)
Sl st across to the next ch-2 corner sp.
R5: Ch 3, 2 dc, ch 2, 3 dc in the same corner sp. [[Ch 1, 3 dc in the next ch-1 sp] × 3, ch 1, (3 dc, ch 2, 3 dc) in the next corner sp] × 3. [Ch 1, 3 dc in the next ch-1 sp] × 3, ch 1. Join to the beginning ch 3. (60 dc, 4 ch-2 corner spaces, 16 ch-1 spaces; 20 clusters)
Sl st across to the next ch-2 corner sp.
R6: Ch 3, 2 dc, ch 2, 3 dc in the same corner sp. [[Ch 1, 3 dc in the next ch-1 sp] × 4, ch 1, (3 dc, ch 2, 3 dc) in the next corner sp] × 3. [Ch 1, 3 dc in the next ch-1 sp] × 4, ch 1. Join to the beginning ch 3. (72 dc, 4 ch-2 corner spaces, 20 ch-1 spaces; 24 clusters)
Outer single-crochet edging
Work one narrow edging round outside R6. This creates a smoother perimeter while preserving the open granny construction.
Sl st across to the next ch-2 corner sp.
R7: Ch 1; this does not count as a stitch. Work 3 sc in the corner sp. Continue with 1 sc in each dc and 1 sc in each ch-1 sp. Work 3 sc in each remaining ch-2 corner sp. Join with a sl st to the first sc. Fasten off. (104 sc)
🧶 Checkpoint: Block the blue base before adding the appliqués. The six granny rounds should remain open and flat, with one narrow edging around the outside and relaxed openings at all four corners.
Broad yellow crescent moon
The moon is crocheted separately and attached afterward. Five shaped rows give the crescent enough depth through the middle and lower arm for the sleeping cat to rest across it.
With yellow, ch 25.
Row 1: Beginning in the second ch from the hook, sc in each ch across. Turn. (24 sc)
Row 2: Ch 2, turn. Sl st loosely in the first sc, hdc in the next 2 sts, [2 hdc in the next st, hdc in the next 2 sts] × 6, hdc in the next 2 sts. Leave the final sc unworked. Turn. The edge sl st does not count. (28 hdc)
Row 3: Ch 2, turn. Sl st loosely in the first hdc, hdc in the next 3 sts, [2 hdc in the next st, hdc in the next 2 sts] × 7, hdc in the next 2 sts. Leave the final hdc unworked. Turn. (33 hdc)
Row 4: Ch 3, turn. Sl st loosely in each of the first 2 hdc, dc in the next st, [2 dc in the next st, dc in the next 2 sts] × 9, dc in the next st. Leave the final 2 hdc unworked. Turn. (38 dc)
Row 5: Ch 3, turn. Sl st loosely in each of the first 2 dc, dc in each of the next 2 sts, [2 dc in the next st, dc in each of the next 3 sts] × 8. Leave the final 2 dc unworked. Fasten off. (42 dc)
With Row 1 forming the inner edge, gently shape the piece into a crescent with the opening facing right. The left and lower portions should remain broad and rounded. Both ends narrow gradually, with the upper tip slightly longer than the lower-right tip.
Lightly dampen and pin the moon into its crescent shape before assembly. Avoid stretching the tips into sharp points; they should remain softly rounded.
🧶 Checkpoint: The crescent should have a noticeably shorter inner curve and a broad outer curve. The lower arm needs enough width to remain clearly visible beneath the cat body and paw.
Black cat body
The body is a separate low horizontal oval.
With black, ch 7.
R1: Work 2 sc in the second ch from the hook, sc in each of the next 4 ch, 4 sc in the final ch. Rotate the foundation chain and work into the unused loops along the opposite side: sc in each of the next 4 ch, 2 sc in the remaining loop of the first ch. Place a marker. (16 sc)
R2: 2 sc in each of the first 2 sts, sc in the next 4 sts, 2 sc in each of the next 4 sts, sc in the next 4 sts, 2 sc in each of the final 2 sts. (24 sc)
R3: [Sc in the next st, 2 sc in the next st] × 2, sc in the next 4 sts, [sc in the next st, 2 sc in the next st] × 4, sc in the next 4 sts, [sc in the next st, 2 sc in the next st] × 2. (32 sc)
R4: Sc in each st around. (32 sc)
Sl st in the next stitch and fasten off with a long sewing tail. Flatten the body gently so it remains wider than it is tall.
Black cat head
The head is a smaller horizontal oval rather than a perfect circle.
With black, ch 5.
R1: Work 2 sc in the second ch from the hook, sc in each of the next 2 ch, 4 sc in the final ch. Rotate the chain. Sc in each of the next 2 unused loops, then work 2 sc in the remaining loop of the first ch. Place a marker. (12 sc)
R2: 2 sc in each of the first 2 sts, sc in the next 2 sts, 2 sc in each of the next 4 sts, sc in the next 2 sts, 2 sc in each of the final 2 sts. (20 sc)
R3: [Sc in the next st, 2 sc in the next st] × 2, sc in the next 2 sts, [sc in the next st, 2 sc in the next st] × 4, sc in the next 2 sts, [sc in the next st, 2 sc in the next st] × 2. (28 sc)
R4: Sc in each st around. (28 sc)
Sl st in the next stitch and fasten off. Do not sew the head down yet; crochet the ears first.
Two small rounded-triangle ears
The ears are worked directly from the upper edge of the head. Each one has a three-stitch-wide base that narrows over two short rows. This gives a more defined cat-ear silhouette while keeping the tips soft rather than needle-sharp.
Flatten the head horizontally and locate the center of its upper long edge. Mark two groups of three consecutive stitches, one group on either side of the center, leaving approximately one unworked stitch between the two ear bases.
Left ear, Row 1: With RS facing, join black in the first stitch of the left marked group. Ch 1; this does not count. Sc in the same stitch and in each of the next 2 marked stitches. Turn. (3 sc)
Left ear, Row 2: Ch 1, sc2tog over the first 2 sts, sc in the final st. Turn. (2 sc)
Left ear, Row 3: Ch 1, sc2tog. Fasten off. (1 sc)
Right ear: Repeat Rows 1–3 across the three marked stitches on the opposite side of the head.
Gently pinch each tiny ear into shape. The three-stitch base should blend into the head, while the final stitch creates a small rounded peak. Make sure there is a clear dip between the two ears.
One hanging front paw
The cat has one front paw extending diagonally downward from beneath the head.
With black, ch 7.
R1: Beginning in the second ch from the hook, sc in that ch and in each of the next 4 ch. Work 4 sc in the final ch. Rotate the foundation chain and work 1 sc in each of the 5 unused loops on the opposite side. Join with a sl st to the first sc. (14 sc)
Fasten off with a long sewing tail. The beginning end is narrower and will be concealed underneath the cat, while the end containing 4 sc forms the rounded visible paw.
Thick tapered tail
The tail is made separately. It stays fairly thick through most of its length, then narrows gradually near the free end. The hook-shaped curve is formed during assembly.
With black, ch 5.
Row 1: Beginning in the second ch from the hook, sc in each ch across. Turn. (4 sc)
Row 2: Ch 1, turn, sc in each st across. (4 sc)
Row 3: Ch 1, turn, sc in each st across. (4 sc)
Row 4: Ch 1, turn, sc in each st across. (4 sc)
Row 5: Ch 1, turn, sc in each st across. (4 sc)
Row 6: Ch 1, turn, sc in each st across. (4 sc)
Row 7: Ch 1, turn, sc2tog over the first 2 sts, sc in each of the final 2 sts. (3 sc)
Row 8: Ch 1, turn, sc in each st across. (3 sc)
Row 9: Ch 1, turn, sc2tog over the first 2 sts, sc in the final st. (2 sc)
Row 10: Ch 1, turn, sc2tog. Fasten off with a long sewing tail. (1 sc)
Rows 1–6 form the thick portion beside the body. Rows 7–10 create the gradual tapered end. Smooth the final stitch between your fingers so the tip stays rounded rather than pointed.
Assembling the moon and sleeping cat
Attach the crescent
Lay the blocked blue square RS up. Position the crescent slightly left of center with its opening facing right. The upper tip points into the upper-middle portion of the square, while the broad outside curve runs down the left side and sweeps across the lower center.
The lower arm should extend farther toward the right than the upper tip. Leave at least one complete blue granny round visible between the moon and the outer edge of the square.
Using yellow yarn, sew around the entire crescent with small whip stitches. Catch the solid blue cluster stitches whenever practical rather than pulling sewing yarn tightly across the open spaces.
Position the cat body
Place the black oval horizontally across the lower-right portion of the crescent. The left half of the body rests over the yellow moon, while the rear of the body approaches the open right side of the crescent.
The body should remain low and nearly horizontal. Sew around its outside edge with black yarn.
Add the head
Place the head over the left end of the body. Approximately the lower quarter of the head should overlap the body so the two separate shapes read as one reclining cat.
Keep the head fairly low. Both ears should project clearly above the head, with the small center gap between them still visible.
Sew around the main oval portion of the head. Do not sew over the outer edges or tips of the ears.
🧶 Checkpoint: Before adding the paw and tail, the cat should already look like one sleeping silhouette: a low oval head with two distinct ears overlapping the left side of a longer horizontal body.
Attach the hanging paw
Slide the narrow end of the paw beneath the lower junction of the head and body. Hide roughly the upper third beneath the larger black pieces and sew that concealed section securely.
Angle the visible portion diagonally downward and slightly toward the left across the yellow moon. The rounded tip should remain free and clearly visible.
Shape and attach the tail
Place the four-stitch-wide end of the tail beneath the right rear portion of the body. Hide approximately the first two rows underneath the body and sew them securely in place.
Guide the thick section downward beside the right edge of the body. Curve the narrowing end gently inward toward the lower-left to form a relaxed hook.
Arrange the curve before adding any additional stitches. Tack the tail once around its middle and again close to the tapered tip. Leave the areas between those tacks slightly raised rather than sewing the entire strip rigidly flat.
The lower tail should overlap the yellow moon. Keep a small section of the moon’s lower-right tip visible beyond the tail instead of covering that yellow tip completely.
Add the sleepy eyes
Thread a yarn needle with pale yellow or cream yarn. Place the two eyes across the lower-middle portion of the head, below the ears.
Each closed eye should span about two crochet stitches. Use two short embroidery stitches to create each shallow downward curve. Keep several black stitches between the eyes and use relaxed tension so the embroidery does not pucker the head.
Leave the rest of the face plain. No nose, mouth, muzzle, or whiskers are needed.
Finishing your square
Weave all remaining ends into the WS. When securing yarn behind the granny square, pass through the solid cluster stitches rather than stretching yarn across the open chain spaces.
If attaching the appliqués has pulled the center slightly out of shape, lightly damp-block the completed square again. Pin the blue outer perimeter into shape and gently smooth the crescent and cat with your fingers without stretching them.
Allow the square to dry completely before removing the pins.
Troubleshooting
- The blue corners pull inward: the corner chains or final sc edging are probably too tight. Relax those stitches and re-block the base.
- The moon looks too thin: make sure all five shaped rows were completed and that the increases in the center of each row were not missed.
- The moon remains almost straight: the outer edge needs considerably more length than the inner foundation edge. Recheck the increase repeats in Rows 2–5.
- The crescent ruffles: the increases are probably much looser than the surrounding stitches. Even out the tension and block the moon before assembly.
- The ears look like round bumps: make sure each ear is worked over three short rows rather than as a one-row fan. The decrease rows are what create the tapered cat-ear shape.
- One ear disappears during assembly: avoid catching the ear edges when sewing the head down and reshape both small peaks afterward.
- The paw looks detached: tuck more of its narrow end underneath the head-body junction so the visible portion begins naturally beneath the cat.
- The tail looks rectangular: check the decreases in Rows 7, 9, and 10, then curve the piece before tacking it to the moon.
- The tail stays straight: secure only its body end, middle, and tip rather than sewing every edge stitch flat.
Final check
- The blue base has six granny rounds followed by one narrow single-crochet perimeter.
- The yellow crescent is broad through its left and lower curves and narrows into two softly rounded tips.
- The black cat has one low horizontal body, one smaller head, exactly two clearly separated ears, and one hanging front paw.
- The tail begins thick at the rear of the body, curves downward, and narrows gradually near its free end.
- A small yellow moon tip remains visible to the right of the black tail, and two pale curved stitches form the only facial details.
Once the finished square is blocked and dry, the yellow crescent should remain clearly readable around the sleeping cat while the open dusty-blue granny texture frames the whole motif. If you make this square, feel free to share your finished version or leave a question if you get stuck on one of the shaped pieces.












