
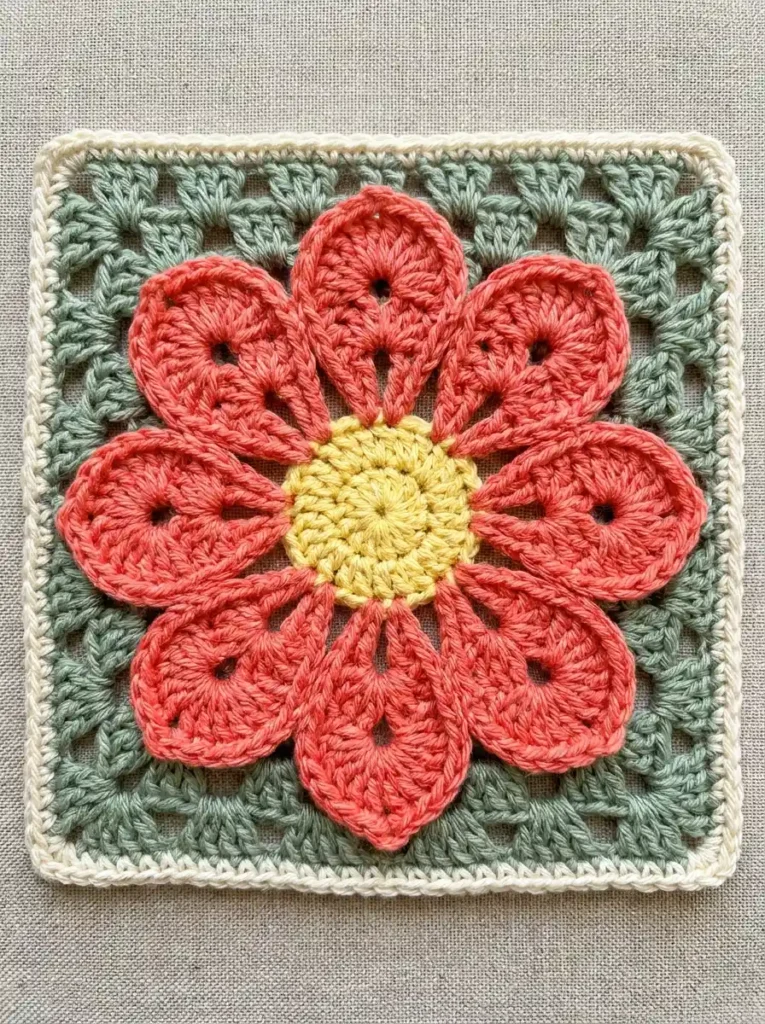
This flower granny square combines a compact golden center with eight oversized coral petals, a roomy sage-green granny frame, and one narrow cream finishing edge. Each petal has a long teardrop opening through the middle and a broad rounded outer curve, giving the flower its distinctive chubby shape.
The motif is worked from the center outward. The petals are crocheted directly into the front loops of the yellow center, while the green foundation uses the unused back loops behind them. A short expansion round creates enough room around the large flower before the motif is squared, so the petals can stay raised without crowding the green frame.
Project at a glance
| Skill level | Confident beginner to intermediate |
|---|---|
| Terminology | US crochet terms |
| Construction | Center-out motif with integrated raised petals |
| Yarn | DK cotton or smooth cotton blend |
| Hook | 3.5 mm, or size needed for a firm but flexible fabric |
Materials
- DK-weight cotton or smooth cotton-blend yarn in warm golden yellow for the center
- DK-weight cotton or smooth cotton-blend yarn in coral or dusty red-pink for the petals
- DK-weight cotton or smooth cotton-blend yarn in muted sage green for the square
- DK-weight cotton or smooth cotton-blend yarn in warm cream for the final border
- 3.5 mm crochet hook
- Yarn needle
- Scissors
- Blocking mat and pins, optional
A smooth cotton yarn suits this motif especially well because the flower depends on crisp petal outlines and clearly defined granny clusters. Use the same yarn weight for all four colors so the raised flower and square frame stay visually balanced.
Stitches and abbreviations
- ch – chain
- sl st – slip stitch
- sc – single crochet
- hdc – half double crochet
- dc – double crochet
- st(s) – stitch(es)
- sp – space
- FLO – front loop only
- BLO – back loop only
- RS – right side
Before you start
Keep the RS facing throughout and do not turn between rounds. In the yellow center, beginning ch 1 does not count as a stitch. In the green granny rounds, beginning ch 3 counts as the first dc.
The final yellow round contains 32 stitches. Divide those mentally into eight groups of four. Each coral petal occupies one four-stitch group on the front-loop side, while all 32 back loops remain available for the green foundation.
The long chain arch inside each petal is an important part of the design. Keep all eight ch-9 arches at similar tension. They should be loose enough to form an obvious teardrop opening but firm enough that the petals hold their rounded shape.
Crochet pattern
Golden flower center
With golden-yellow yarn, make an adjustable ring.
R1: Ch 1, work 8 sc into the ring. Pull the ring firmly closed and join with sl st to the first sc. (8 sc)
R2: Ch 1, work 2 hdc in each st around. Join with sl st to the first hdc. (16 hdc)
R3: Ch 1, [1 hdc in next st, 2 hdc in next st] × 8. Join with sl st to the first hdc. (24 hdc)
R4: Ch 1, [1 hdc in each of next 2 sts, 2 hdc in next st] × 8. Join with sl st to the first hdc. (32 hdc)
Fasten off yellow. The center should lie flat with a compact middle and a smooth circular outer edge.
Eight chubby coral petals
The petals are crocheted directly into the FLO of R4. The unused back loops must remain free because they will support the green section later.
With the RS facing, join coral yarn with a sl st in the FLO of any stitch of R4. Treat this as the first stitch of Petal 1’s four-stitch group.
Petal 1: Ch 9. Skip the next 2 yellow stitches and sl st in the FLO of the following stitch. The chain now forms a long arch between the first and fourth stitches of the group.
Working around the ch-9 arch, work 2 sc, 3 hdc, 6 dc, 3 hdc, 2 sc. Slide the stitches gradually along the arch as you work. Keep the six dc concentrated around the outer half of the arch so the petal becomes broad and rounded at the end rather than narrow and pointed.
Sl st into the first yellow anchor of the petal. (16 sts around the petal arch)
To reach the next petal position, sl st in the FLO of each of the next 4 yellow stitches. The fourth slip stitch lands in the first stitch of the next four-stitch group and becomes the starting anchor for the next petal.
Petals 2–7: Repeat the same sequence six more times: ch 9, skip the next 2 yellow sts, sl st in FLO of the following st; work 2 sc, 3 hdc, 6 dc, 3 hdc, 2 sc around the ch-9 arch; sl st into the petal’s first anchor; then sl st in FLO of the next 4 yellow sts to reach the next starting anchor.
Petal 8: Ch 9, skip the next 2 yellow sts and sl st in FLO of the following st. Work 2 sc, 3 hdc, 6 dc, 3 hdc, 2 sc around the arch and sl st into the first anchor of Petal 8.
Sl st in the FLO of the remaining 3 yellow stitches, then join with sl st to the original coral joining stitch. Fasten off. (8 petals)
🧶 Checkpoint: The flower should now have exactly eight large petals with narrow bases, long teardrop openings, and broad rounded outer ends. Gently slide the stitches around each chain arch until the openings and outer curves look reasonably even.
Allow neighboring petals to touch or overlap slightly near their lower edges. The outer halves should remain individually recognizable rather than merging into one continuous ruffle.
Create the hidden sage-green foundation
Lift the coral petals gently toward you so you can see the unused back loops of yellow R4. This first green round sits mostly behind the flower and expands the working circumference before the granny clusters begin.
Join sage-green yarn in the BLO of any stitch of yellow R4.
Green foundation round: Ch 1, work 1 sc in the same BLO, ch 2, skip the next BLO. [1 sc in the next BLO, ch 2, skip the next BLO] × 15. Join with sl st to the first sc. (16 sc, 16 ch-2 spaces)
Keep the ch-2 spaces relaxed. This expansion round is what gives the green background enough circumference to sit behind the oversized petals without pulling the yellow center outward.
Build the green support ring
Sl st into the first ch-2 space.
Green R1: Ch 3, work 2 dc in the same ch-2 space, ch 1. [Work 3 dc in the next ch-2 space, ch 1] × 15. Join with sl st to the top of the beginning ch 3. (16 clusters, 16 ch-1 spaces)
This ring remains partially hidden behind the coral petals. The extra clusters provide a much broader foundation for the square than attaching only a few groups directly to the yellow center.
Turn the support ring into a square
Sl st across the first cluster and into the next ch-1 space. This becomes Corner 1. Every fourth ch-1 space around the ring will become another corner, leaving three ordinary spaces between neighboring corners.
Green R2: In the first corner space, ch 3, 2 dc, ch 2, 3 dc, ch 1. [Work 3 dc in the next ch-1 space, ch 1] × 3.
[In the next ch-1 space work 3 dc, ch 2, 3 dc, ch 1; then work 3 dc in each of the next 3 ch-1 spaces, with ch 1 after each cluster] × 3.
Join with sl st to the top of the beginning ch 3. (20 clusters, 16 ch-1 side spaces, 4 ch-2 corner spaces)
The square should now have four clear corners and three ordinary granny clusters centered along each side between the corner groups.
Build the sage-green granny frame
Sl st across to the next ch-2 corner space.
Green R3: In the corner space, ch 3, 2 dc, ch 2, 3 dc, ch 1. [Work 3 dc in the next ch-1 side space, ch 1] × 4.
[In the next corner work 3 dc, ch 2, 3 dc, ch 1; then work 3 dc in each of the next 4 ch-1 side spaces, with ch 1 after each cluster] × 3.
Join with sl st to the top of the beginning ch 3. (24 clusters, 20 ch-1 side spaces, 4 ch-2 corner spaces)
Sl st across to the next ch-2 corner space.
Green R4: In the corner space, ch 3, 2 dc, ch 2, 3 dc, ch 1. [Work 3 dc in the next ch-1 side space, ch 1] × 5.
[In the next corner work 3 dc, ch 2, 3 dc, ch 1; then work 3 dc in each of the next 5 ch-1 side spaces, with ch 1 after each cluster] × 3.
Join with sl st to the top of the beginning ch 3. (28 clusters, 24 ch-1 side spaces, 4 ch-2 corner spaces)
Fasten off sage green.
🧶 Checkpoint: Before adding the cream edge, lay the square flat. The green frame should extend clearly beyond all eight petals, the outer side should have five ordinary clusters between neighboring corner groups, and the flower should remain centered without forcing the square to bow outward.
Add the narrow cream border
The cream edging is intentionally much narrower than the green granny frame. It creates a clean outline without adding another heavy structural layer.
Join cream yarn in any ch-2 corner space.
Cream R1: Ch 1, work 3 sc in the same corner space. Work 1 sc in every dc and 1 sc in every ch-1 space across the side. In the next ch-2 corner space work 3 sc.
Continue around all four sides in the same way, placing 1 sc in every dc and ch-1 side space and 3 sc in every ch-2 corner space. Join with sl st to the first sc. (120 sc)
Fasten off.
Finishing your flower granny square
Weave the yellow and coral ends securely into the back without pulling the center or petal bases inward. When securing the coral tail, avoid stitching through the outer petal edges because those edges need to remain free to create the raised look.
Shape each petal with your fingers before blocking. Spread the six dc across the broad outer curve, keep the shorter stitches closer to the base, and gently open the teardrop space inside each petal. Small differences among the petals look natural, but all eight openings should remain clearly visible.
Block the square lightly rather than stretching it aggressively. Pin the four cream corners first, straighten the four sides, and arrange the petals afterward. Leave the petals slightly raised instead of pinning them completely flat against the sage-green background.
Troubleshooting
- The petals look pointed instead of chubby: move more of the six dc toward the outer half of each chain arch. The tallest stitches should form the broad rounded end while the sc and hdc stay closer to the petal base.
- The petal openings are inconsistent: check the tension of the ch-9 arches before changing stitch counts. One loose chain arch can create a much larger opening than the others.
- The flower is pulling the green frame inward: the hidden green foundation ch-2 spaces are probably too tight. Work that expansion round more loosely so it can spread behind the petals.
- The square has too little green space around the flower: make sure the 16-space green foundation and all three square-building rounds were completed. Omitting the expansion or one granny round makes the frame noticeably smaller.
- The corners cup upward: loosen the ch-2 corner spaces. The two corner clusters need enough room to spread at a right angle.
Making the square larger
For a larger block, add another sage-green granny round before the cream edging. In each ch-2 corner work 3 dc, ch 2, 3 dc. Work one 3-dc cluster in every ch-1 side space, with ch 1 between neighboring clusters.
Then add the cream sc edging around the new outer round. One additional green round keeps the flower prominent; several extra rounds will gradually make the coral flower look smaller in relation to the square.
Once lightly blocked, the finished motif should have a compact golden center, exactly eight large open coral petals, a clearly visible sage-green granny frame, and one narrow cream outline around the entire square. If you make one, feel free to share your finished motif or leave a question if you get stuck on the petal or squaring rounds.












